
This technique of oil painting is one I prefer using. Blending
For this painting, you will need the following:
- Primmed canvas or board
- Brush of 38mm
- Round brush with hog bristle number 5
- Sable bristle round brush number 2
- Sable bristle round brush number 4
- Refined linen oil
- Turpentine
- Damar Varnish
- French Ultramarine
- Sky Blue
- Ocre Yellow
- Naples Yellow
- Veridian Green
- Burnt Sienna
- Cadmium Red
- Raw Umber
- Alizarin Red
- Titanium White
- African Black


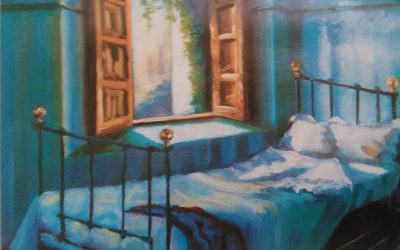
Painting of still life
Use the mixture of Cadmium Red and French Ultramarine to paint the entire surface you work on. Use the 38 mm brush to do so with wide strokes. Leave the paint to dry overnight. Then use the round sable bristle brush number 2 to do a rough sketch of the composition with Burnt Sienna diluted with turpentine to almost liquid state.
Mix the colours with the medium containing linen oil and damar varnish in equal proportion and two parts of turpentine this will make your painting look luxurious. Put a bit of Titanium white on the pallet and ad to it just a bit of Ocre Yellow and a bit of Raw Umber just enough to minimize the whiteness.
With round, hog bristles brush number 5 roughly paint the white stripes of the wallpaper and start painting the tablecloth turning the brush in order to get lively looking strokes. For blue stripes on the wallpaper use the mixture of two different blue colours, one warm and one cold.
Paint the stripes behind the plant with a mixture of the Sky blue and white using almost completely dry colour applied with rough strokes almost in a state of a sketch to make them look like they are in the background. If you do a more precise painting of the stripes they will draw too much attention and your painting will lose the sense of depth. For the rest of the stripes use the mixture of French Ultramarine and white.
Determine the areas of light and shade on the bowl and cover them using the mixture of French Ultramarine, African Black, Alizarin Red and White for the lighter tone and for the darker tone add Ocre Yellow to that mixture.
Do the same with the pot using different proportions of Cadmium Red, Burnt Sienna and white to achieve the light, dark and middle tones. Apply the colours widely without trying to blend them in this phase of painting.


Building the composition
Add the colours here and there on the objects in order to be able to see the composition growing in a balance between the different tones and colours. Colour deep shades on the mug and the pitcher with Ocre Yellow and Raw Umber then apply middle tones using the grey colour. Add smears of pale purple gained by mixing Alizarin and White with a bit of black on the areas of the mug and the pitcher where light reflects of the purple flowers.
Use the mixture of Naples Yellow and white for illuminated spots on the right side of the pitcher and with the same colour add shade to the white tablecloth. Go to the egg cup and paint it with the mixture of Ultramarine and Sky Blue, for darker area add Alizarin Red.
With round Sable brush number 4 sketch the basic shapes of the plant. With Veridian Green, Ultramarine, White and grey make various green colours to paint the leaves. Do the same thing for the flowers using Cadmium Red, Alizarin Red and white to make warm and cold tones.


Adding the details
Continue working with the same brush. Paint the patterns on the bowl with the mixture of Ultramarine and white adding a bit of Alizarin Red for shaded areas. With all the colours and tones in place, you can start giving shape and volume to the objects by blending tones. WIth round Sable brush number 4 paint the mug using same colours you already painted on it but this time work wet on wet paint to get more balanced light and dark tones.
Add some Naples Yellow to white colour to paint the lightest areas on the edge of the mug. Continue working on the painting covering large areas of colour and blending it together. Paint greenish shades inside the egg cup and under the plate with the combination of Ocre Yellow and a little bit of black and white. Use the Naples Yellow and white mixture you already used for the mug to paint the lightest areas of the edge of the cup too.


Finishing steps
Step back from the painting and look at the changes in the colour and tone on the surface of the pitcher which reflects all the colours from its surroundings. Use the Sable paintbrush number 4 to add smears of colour-pale nuances of purple, blue and pink, greenish grey and bluish grey using all the colours you previously mixed on the palette.
Then finish the white tablecloth using pure white for the lightest areas adding blue and grey from the palette to the white for the shaded areas. Continue working on your painting until the moment you are fully satisfied. Add details, light and shade, small spreads off colour here and there all to the point you think the painting is complete.
After the painting is completely dry on touch varnish it to preserve the colours and give it a nice additional shine.
Remember the most important thing in art – always experiment that is the only way to find what really suits you, what feels the best. Art is supposed to be fun. If you have any questions regarding the subject I wrote about feel free to leave them below and I will be more than happy to answer.


0 Comments